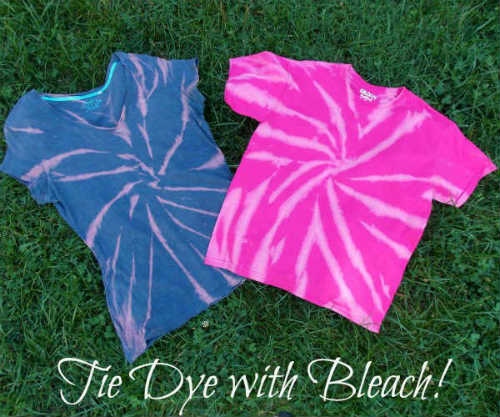
Tie dye is a fun and easy way to add some color to your wardrobe, but sometimes you may want to change up the colors or pattern. Bleaching is a great way to reverse tie dye and give new life to your clothes. It is important to note that bleaching will remove all the color from your fabric, so you will need to re-dye it if you want it to be colorful again. Follow the steps below to reverse tie dye with bleach.
Supplies Needed For Reverse Tie Dye
You will need a white or light colored shirt, bleach, a spray bottle, and rubber bands. When reverse tie dyeing with bleach, you will need a few supplies to get started. You will also need a work space that can get a little messy, like a porch or garage.
Tie Dye Techniques
This technique uses bleach to remove color from the fabric, resulting in a white or light-colored design. Tie dye is a popular technique for adding color to fabric. There are many different ways to tie dye fabric, and each results in a unique pattern. One popular way to tie dye is to reverse tie dye with bleach.
Cotton is the best fabric to use for this technique, but you can also use other fabrics such as silk or wool. Reverse tie dye with bleach is a simple process that anyone can do. You can use any color combination you like, but it is best to use light colors such as white, cream, or pale blue. The first step is to choose the fabric you want to use. The next step is to choose the colors you want to use.
Once you have chosen the fabric and colors, you will need to prepare the bleach solution. The ratio of bleach to water should be 1:1. You can either mix the bleach and water together in a bowl or container, or you can use a spray bottle to mix the solution.

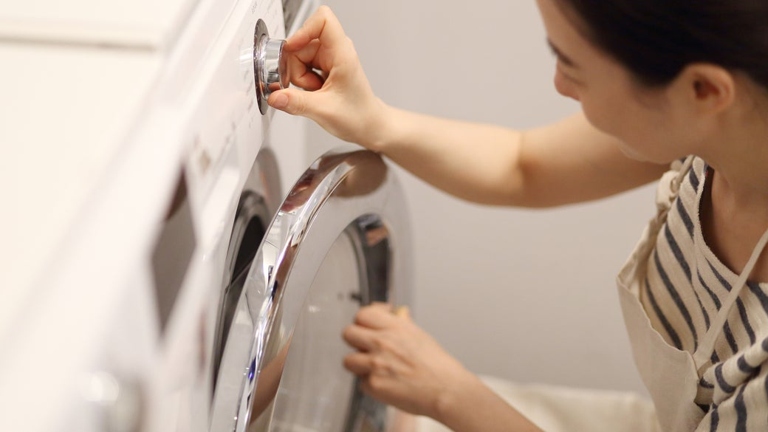
After soaking, rinse the fabric in cold water and then wash it in the washing machine. Once the bleach solution is mixed, you will need to soak the fabric in the solution for 1-2 hours. The longer you soak the fabric, the lighter the color will be.
After soaking, rinse the fabric in cold water and then wash it in the washing machine. The longer you soak the fabric, the lighter the color will be. There are many different ways to tie dye fabric, so you can be creative and experiment with different techniques. Once you have tied the fabric, you will need to soak it in the bleach solution for 1-2 hours. Once the fabric is washed, you can now start to tie dye it.
Your fabric is now ready to be used for any project you like. Have fun and be creative!
Different Folding Techniques
There are a variety of different folding techniques that can be used when tie dying fabric. The most common and basic technique is to simply fold the fabric in half, then in half again, and then in half once more. Once the fabric is folded, it can be tied with string or elastic to create different patterns. This creates a small, manageable square that is easy to work with.
Another common folding technique is to roll the fabric up into a tight cylinder. Once the fabric is rolled up, it can be tied with string or elastic to create different patterns. This is often done with longer pieces of fabric, such as a T-shirt.
A less common, but still effective, folding technique is to pleat the fabric. This is done by folding the fabric back and forth in small, even pleats. Once the fabric is pleated, it can be tied with string or elastic to create different patterns.
Finally, a more advanced folding technique is to create a spiral fold. This is done by folding the fabric in half, then in half again, and then in half once more. Once the fabric is folded, it is then rolled up into a tight cylinder. Once the fabric is rolled up, it is then tied with string or elastic to create different patterns.
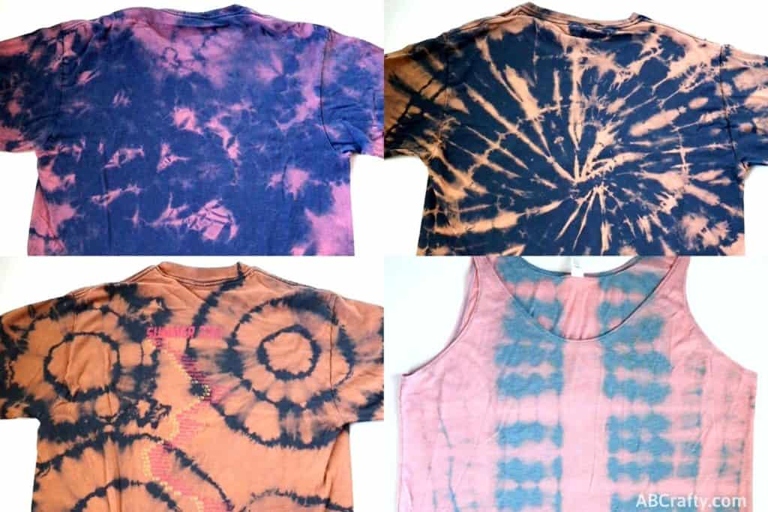
Different Bleaching Techniques
This will lighten the tie dye and make it easier to remove. This can be done by drawing or spraying bleach over the areas that you want to remove the tie dye from. There are a few different ways that you can reverse tie dye with bleach. Once the tie dye has been removed, you can then rinse the fabric in cold water. Another way is to use a bleach pen or a bleach spray to selectively remove the tie dye from the fabric. One way is to simply soak the tie dye garment in a bleach and water solution for a few hours.
Different Tie Dye Patterns
Different Tie Dye Patterns
Tie dye is a fun and easy way to add some color to your wardrobe. There are many different tie dye patterns that you can create, and the best part is that each one is unique. Here are some different tie dye patterns that you can try:
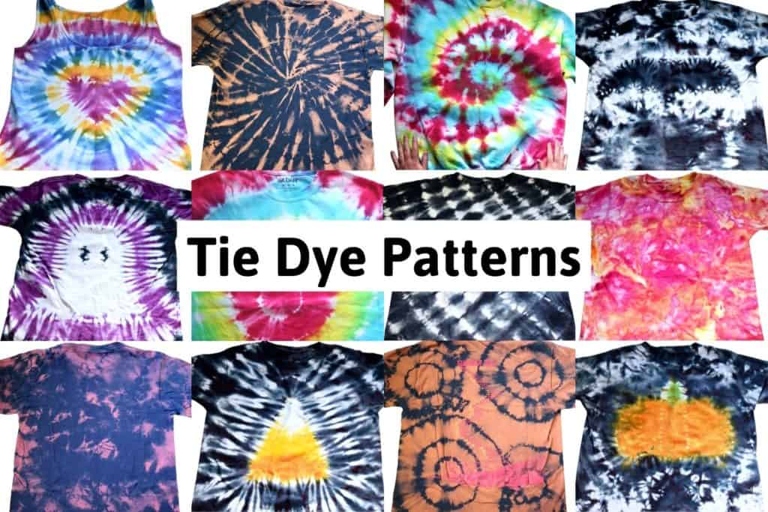
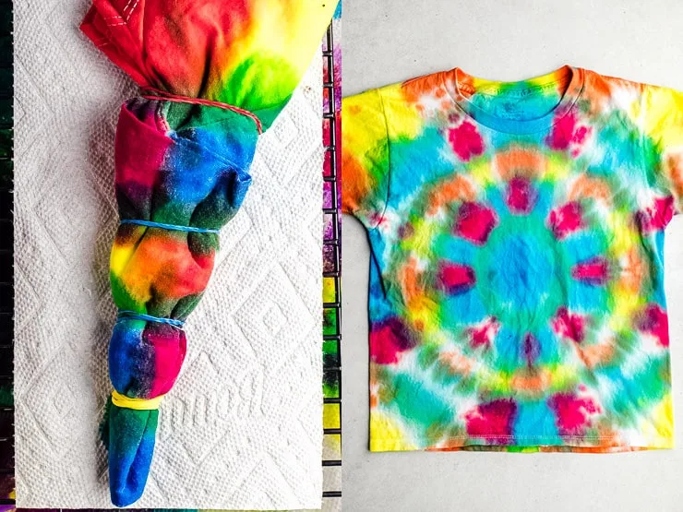
Then, tie a piece of string around the center of the spiral. Dip your fabric into the dye, and then carefully remove it and allow it to dry. To create a spiral, start by folding your fabric into a tight spiral. 1. The spiral: This is the most classic tie dye pattern.
However, instead of tying a string around the center, you will tie it around the outside of the spiral. 2. The bullseye: This pattern is created by folding the fabric into a tight spiral, as with the spiral pattern. Dip your fabric into the dye, and then carefully remove it and allow it to dry.
However, instead of tying a string around the center, you will tie it around the outside of the spiral. 3. The sunburst: This pattern is created by folding the fabric into a tight spiral, as with the spiral pattern. Dip the outside of the spiral into the dye, and then carefully remove it and allow it to dry.
However, instead of tying a string around the center, you will tie it around the outside of the spiral. 4. The zigzag: This pattern is created by folding the fabric into a tight spiral, as with the spiral pattern. Dip the outside of the spiral into the dye, and then carefully remove it and allow it to dry.
However, instead of tying a string around the center, you will tie it around the outside of the spiral. 5. The wave: This pattern is created by folding the fabric into a tight spiral, as with the spiral pattern. Dip the outside of the spiral into the dye, and then carefully remove it and allow it to dry.
Fabric Color Changes Using Bleach
However, sometimes you may want to change the color of your tie dyed fabric, or remove the color entirely. This can be done by bleaching the fabric. Tie dye is a popular fabric dyeing technique that results in colorful, unique patterns.
Bleaching tie dyed fabric is a simple process, but it is important to keep a few things in mind. First, bleaching will remove all color from the fabric, so it is important to choose a new color that you like. Second, bleaching can damage fabric, so it is important to test a small area first to make sure the fabric can withstand the bleaching process.
To bleach tie dyed fabric, you will need:
-Tie dyed fabric
-Bleach
-Water
-Bucket or sink
The ratio of water to bleach should be about 1:1. 1. Fill a bucket or sink with water and add bleach.
2. Submerge the tie dyed fabric in the bleach water.
3. Let the fabric soak for about 15 minutes, or until the desired color is achieved.
4. Remove the fabric from the bleach water and rinse thoroughly with clean water.
5. Wash the fabric in the washing machine with detergent.
6. Dry the fabric in the dryer.
Now you have successfully changed the color of your tie dyed fabric using bleach!
Getting Started – Reverse Tie Dye Instructions
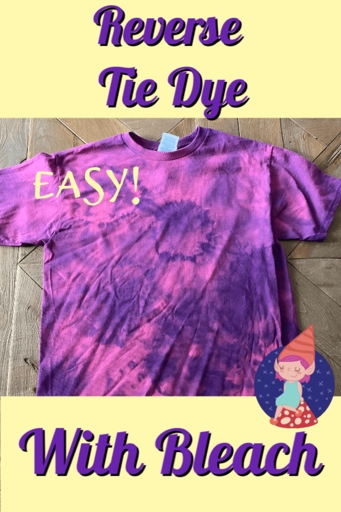
So, if you’re looking to add a little something extra to your clothes, read on for reverse tie dye instructions. The best part about reverse tie dye is that it’s easy to do and only requires a few supplies. It’s also a great way to upcycle an old shirt or piece of clothing. Reverse tie dye is a fun and unique way to add some color to your wardrobe.
Reverse Tie Dye Patterns
All you need is a bleach pen and some old clothes that you don’t mind ruining. The bleach will remove the color from the fabric, leaving you with a unique and one-of-a-kind design. Reverse tie dye is a fun and easy way to add some flair to your wardrobe. Simply draw your design on the clothing with the bleach pen and then throw it in the washing machine.
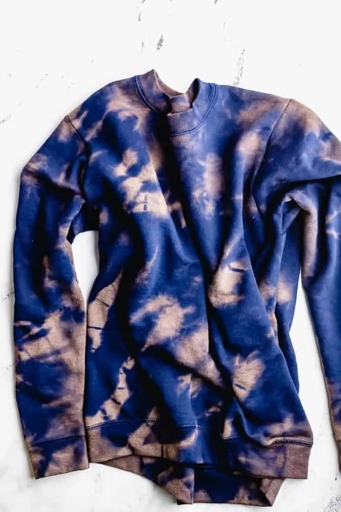
Monochromatic Tie Dye Sweatshirt – Scrunched Pattern
This technique involves using bleach to remove color from fabric, resulting in a design that is the opposite of traditional tie dye. This monochromatic tie dye sweatshirt features a scrunched pattern that is created by reverse tie dyeing with bleach.
Once dry, you will have a unique, one-of-a-kind piece that is perfect for showing your individual style. Dip the balled-up fabric into a second bleach solution, and then allow it to dry. Once the fabric is bleached, rinse it thoroughly and then scrunch it up into a ball. To create this look, start by soaking your fabric in a bleach solution.
DIY Scrunch Bleach Tie Dye Hoodie
DIY Scrunch Bleach Tie Dye Hoodie

First, scrunch up your hoodie and secure it with rubber bands. All you need is a bleach pen and some rubber bands. Once you’re happy with your design, rinse the hoodie in cold water and let it air dry. Next, use the bleach pen to draw a design on the fabric. Be sure to use a light hand, as too much bleach will damage the fabric. Reverse tie dye is a fun and easy way to add some pizzazz to a plain hoodie.
Reverse Tie Dye Sweatshirt – Sunburst Twist
You don’t need any special materials or equipment, just some bleach and a few simple supplies. The best part about this technique is that it’s really easy to do! It’s a really cool and unique way to tie dye that gives the fabric a really cool and unique look. This reverse tie dye technique is called the sunburst twist.
Then, wring it out so that it’s damp but not dripping wet. You’ll also need some bleach, a spray bottle, and some rubber bands. First, wet the sweatshirt in some water. To start, you’ll need a white or light colored sweatshirt.
Once you’ve twisted it tightly, tie a rubber band around each end of the rope. Next, fold the sweatshirt in half so that the sleeves are touching. Then, twist the sweatshirt tightly so that it forms a long rope.
Now, it’s time to bleach the sweatshirt. Fill your spray bottle with bleach, and then carefully and evenly spray the entire surface of the sweatshirt. Be sure to get the bleach into all of the nooks and crannies.
Once the entire sweatshirt is coated in bleach, set it in the sun to dry. The bleach will react with the sunlight and cause the fabric to change colors.
Once the sweatshirt is dry, untie the rubber bands and carefully unroll the rope. You should now have a beautiful reverse tie dye sweatshirt with a sunburst twist!
DIY Bleach Tie Dye T-shirt – Accordion Fold
Reverse tie dye is a technique that uses bleach instead of dye to create interesting patterns on fabric. Instead of vibrant colors, you will end up with white patterns on a colored background. The process is similar to traditional tie dye, but the results are reversed!
Then, soak the shirt in a bleach solution for 30 minutes. Finally, apply your desired design with a bleach pen or brush. To reverse tie dye a t-shirt, start by accordion folding the shirt. Next, rinse the shirt in cold water and dry it.
With a little bit of creativity, you can create unique designs that are sure to stand out! Reverse tie dye is a great way to add interest to plain t-shirts.
Reverse Tie Dye With Bleach Napkins – Shidori Method
Reverse tie dye is a method of tie dying where the fabric is dyed first, and then the design is created by bleaching away the dye in certain areas. This method can be used to create a variety of different patterns, and is a great way to add some interest to a plain piece of fabric.
To reverse tie dye with bleach, you will need:
-A piece of white or light-colored fabric
-Bleach
-A spray bottle
-Rubber bands
-A plastic container
To do this, mix one part bleach with four parts water in a plastic container. First, you will need to soak your fabric in a bleach solution. Submerge your fabric in the solution and let it soak for at least 30 minutes.
Once it is rinsed, you can begin to create your design. Next, remove the fabric from the bleach solution and rinse it thoroughly with water.
To create a basic design, start by folding the fabric in half and then tying it in several places with rubber bands. Be sure to use a light hand when spraying, as you don’t want to completely remove all of the color from the fabric. Once the fabric is tied, you can begin to spray it with bleach.
Once you are happy with your design, rinse the fabric again with water to stop the bleaching process. Allow the fabric to dry completely before removing the rubber bands.
With a little bit of bleach and some rubber bands, you can create a variety of different designs. So have fun and experiment with different techniques to create your own unique reverse tie dye patterns. Reverse tie dye is a fun and easy way to add some personality to a plain piece of fabric.
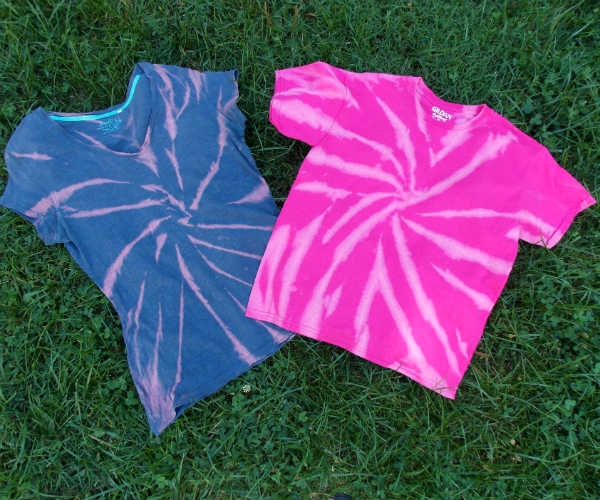
Tie Dye With Bleach – Pink and Blue Tees
Tie Dye With Bleach – Pink and Blue Tees
Reverse tie dye is a technique that allows you to create interesting patterns on fabric using bleach. This guide will show you how to create pink and blue tie dye patterns using this technique.
You will need two shirts (one white and one another color), bleach, rubber bands, and gloves. Make sure to protect your work surface with a plastic sheet or old towel. First, you will need to gather your supplies.
To start, wet the white shirt and wring it out. Next, take the other shirt and dip it in bleach. Then, fold it in half and tie it with rubber bands. Once it is saturated, wring it out and place it over the top of the white shirt.
Now, twist the two shirts together and tie them with rubber bands. Be sure to leave some slack so that the bleach can seep through.
Place the shirts in a well-ventilated area and allow them to sit for at least an hour. The longer you leave them, the more pronounced the effect will be.
Once the time is up, remove the rubber bands and rinse the shirts in cold water. Hang them up to dry and enjoy your new tie dye shirts!
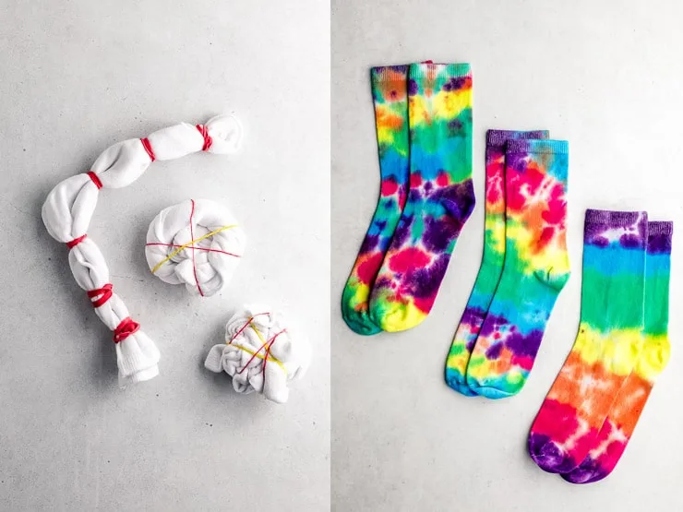
Bleach Tie-Dye Socks – 5 Techniques
Reverse tie dye is a technique that can be used to create some really cool and unique patterns with bleach. It is a bit more complicated than traditional tie dye, but the results are definitely worth it!
To reverse tie dye with bleach, you will need the following supplies:
-Bleach
-Tie dye kit
-White socks
-Rubber bands
Once you have your design, you are ready to start bleaching! The first thing you need to do is to create your design on the socks. This can be done by using rubber bands to create sections on the socks.
You can do this by mixing 1 part bleach with 3 parts water. To bleach the socks, you will need to mix up a bleach solution. Once the solution is mixed, you will need to soak the socks in it for about 5 minutes. After 5 minutes, remove the socks from the bleach and rinse them off with water.
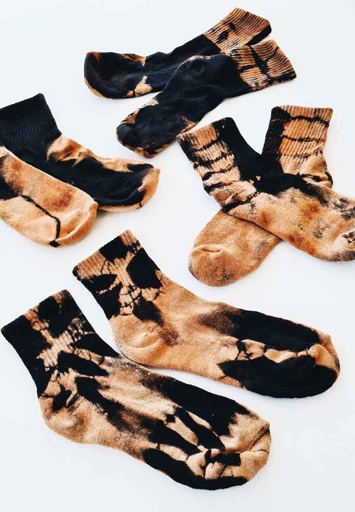
Once the socks are rinsed, you can remove the rubber bands and start to enjoy your new reverse tie dye socks!
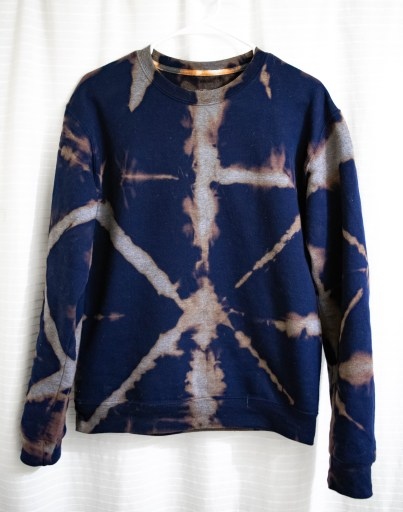
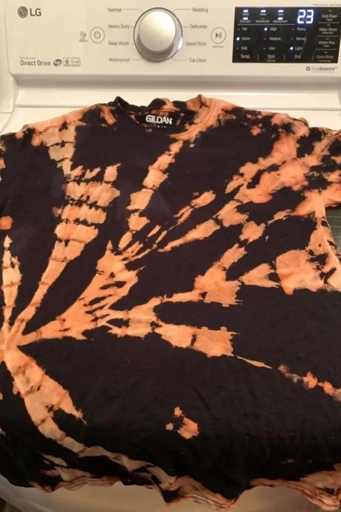
Twisty Circles Reverse Black Tshirt
This creates a tie dye effect that is reversed from the traditional method. The design is created by bleaching the fabric in a spiral pattern, then adding black dye to the center of the spiral. This t-shirt features a unique reverse tie dye pattern in black and white.
Sweatshirt and Pants Reverse Tie-dye
It is also a great way to show off your creative side. There are many different ways to reverse tie dye, but the most popular method is to use bleach. Reverse tie dye is a great way to add some fun and excitement to your wardrobe.
To reverse tie dye with bleach, you will need:
-A white sweatshirt or pair of pants
-A bleach pen or spray bottle
-A piece of cardboard
-A rubber band
This will prevent the bleach from bleeding through to the other side. First, lay your piece of clothing flat on a surface. Then, place the piece of cardboard inside the clothing item, so that it is between the front and back of the fabric.
Next, use the bleach pen or spray bottle to create a design on the front of the clothing item. Be sure to work in a well-ventilated area, and wear gloves to protect your hands.
Once you are happy with your design, wrap a rubber band around the clothing item to secure the cardboard in place. Then, place the clothing item in a sink or tub filled with cold water.
Rinse the clothing item thoroughly with cold water to remove any bleach residue. Allow the clothing item to soak for at least 30 minutes, then remove it from the water and carefully remove the rubber band and cardboard.
Finally, wash the clothing item in the washing machine on the delicate cycle. Hang the clothing item to dry, or dry it on the lowest setting in the dryer.
Reverse tie dye is a fun and easy way to add some personality to your wardrobe. With a little creativity, you can create unique and one-of-a-kind designs.
DIY Tie Dye Jeans
Reverse tie dye is a great way to add some fun and unique patterns to your clothes. All you need to do is soak your clothing in a bleach solution, then apply the bleach to the areas you want to dye. It’s a simple process that anyone can do at home with some bleach and a few other supplies. The bleach will remove the color from the fabric, leaving behind a white or light-colored design.
Experiment and have fun with it! Some popular designs include stripes, polka dots, and spirals. You can use reverse tie dye to create all sorts of different patterns on your clothes. You can also create your own custom designs by bleaching different sections of the fabric in different ways.
So go ahead and give it a try! Reverse tie dye is a great way to add some personality to your clothes.
Reverse Tie Dye With Redye
All you need is a bleach pen and some old tie dye shirts. Reverse tie dye with bleach is a great way to add new life to your old tie dye shirts. It’s a simple process that anyone can do, and it only takes a few minutes.
Redyed T-shirt
It’s a simple process that can be done in a few minutes, and it’s a great way to add some new life to an old t-shirt. Here’s how to do it: Reverse tie dye with redye is a great way to add some new life to an old t-shirt.
First, you’ll need to gather your supplies. You’ll also need gloves and a workspace that can get messy. You’ll need a t-shirt, bleach, a spray bottle, and red dye.
Be sure to get the entire t-shirt wet. Using the spray bottle, evenly mist the t-shirt with bleach. Next, you’ll want to lay out your t-shirt on a flat surface.

You can either pour the dye directly onto the t-shirt, or use the spray bottle to mist it on. Again, be sure to evenly coat the entire t-shirt. Once the t-shirt is wet with bleach, it’s time to add the red dye.
The longer you let it sit, the more vibrant the colors will be. Now it’s time to let the t-shirt sit and soak up the dye. After a few hours, you can rinse the t-shirt in cold water to stop the dyeing process.
Your old t-shirt is now new again, and it’s got a cool reverse tie dye look. And that’s it!
Abstract Reverse Tie-Dye
First, the fabric is dyed, then it is bleached. Reverse tie dye is a technique that can be used to create interesting patterns and designs on fabric. This creates a negative image of the design. It is similar to traditional tie dye, but the order of the steps is reversed.
It can be used to create a one-of-a-kind piece of clothing or home decor. Reverse tie dye is a great way to add interest to a plain piece of fabric. Reverse tie dye is also a great way to upcycle an old piece of clothing.
To reverse tie dye with bleach, you will need:
-Bleach
-Rubber gloves
-A bucket or bowl
-Plain white fabric

-Dye
1. Begin by mixing your bleach and water in the bucket or bowl.
2. Next, soak your fabric in the mixture for 30 minutes.
3. After 30 minutes, remove the fabric from the bleach and rinse it thoroughly.
4. Now it’s time to add your dye. Follow the instructions on the dye package to add the dye to your fabric.
5. Once the dye is applied, allow the fabric to dry completely.
6. Finally, rinse the fabric one last time to remove any excess dye.
Your reverse tie dye fabric is now ready to use!
Reverse Tie Dye Heart T-shirt
First, you will need a white t-shirt. Finally, you will need a red dye. The process is simple and only requires a few supplies. Next, you will need a bleach pen. Reverse tie dye with bleach is a great way to add some pizzazz to an old t-shirt.

Once the heart is drawn, fill it in with the bleach pen. To begin, lay your t-shirt out flat. Be sure to make the heart as big or small as you’d like. Using the bleach pen, draw a heart shape on the front of the shirt.
Be sure to completely cover the bleach with the dye. Next, take your red dye and fill in the heart shape. Once the heart is filled in, set the shirt aside and let the dye dry.
Once the dye is dry, you can wear your new shirt! Be sure to show off your new creation to all of your friends.
Galaxy Dress Tie Dye
Allow the fabric to dry completely before wearing or washing. Once the fabric is bleached, add your desired colors using a redye kit. Galaxy dress tie dye is a type of reverse tie dye where the colors are bleached out to create a white base, and then redye is used to add new colors. To reverse tie dye with redye, first bleached out the fabric to create a white base. This type of tie dye is perfect for creating unique and one-of-a-kind designs.
Galaxy Tie Dye T-shirt
You will need: This is a guide on how to reverse tie dye with bleach.

-A white or light colored tie dye t-shirt
-A bowl of bleach
-A pair of rubber gloves
First, fill the bowl with bleach and then submerge the tie dye t-shirt in it. Next, put on the rubber gloves and begin to rub the bleach into the shirt, working in small sections. Let the shirt soak for a few minutes, then remove it and wring it out. Once you have covered the entire shirt, rinse it off with water and then wash it in the washing machine.
Vortex Reverse Tie Dye Tee
Assuming you would like tips on how to reverse tie dye with bleach:
One way to reverse tie dye is to use bleach. You can either use a bleach pen or a spray bottle filled with bleach and water. Be sure to test the bleach on a small area of the fabric first to make sure it doesn’t damage the fabric.
To use a bleach pen, start by drawing a design on the fabric with the bleach pen. Then, fill a spray bottle with bleach and water and spray the design. The bleach will start to remove the color from the fabric.
To use a spray bottle, start by spraying the fabric with the bleach and water mixture. Then, use a brush to draw a design on the fabric. The bleach will start to remove the color from the fabric.
Tie Dye Using a Bleach Pen
Tie dye is a fun and easy way to add some color to your wardrobe. You can reverse tie dye with bleach! Here’s how to do it: But what do you do when you want to change up your look? Using a bleach pen is the best way to get clean, crisp lines when you’re bleaching tie dye.
Advanced Bleach Patterns – Spray Technique
By selectively bleaching areas of the fabric, you can create a variety of looks. Spray bleach is a great way to create interesting patterns on fabric.
Bleach Splatter Technique
It is also a great way to reverse tie dye with bleach. The bleach splatter technique is a great way to add some pizzazz to your tie dye project. This technique is simple and only requires a few supplies.
What Should Not Be Mixed With Bleach?
Ammonia, for example, should never be mixed with bleach as this can create a toxic gas. Other chemicals, such as drain cleaners, vinegar, and rust removers, should also not be mixed with bleach as they can cause a dangerous chemical reaction. There are a few things that should not be mixed with bleach, as doing so can create dangerous fumes or even explosions.
How Do You Reverse Tie Dye?
How Do You Reverse Tie Dye?
The fabric will be much lighter in color and the design will be less visible. You will need to soak the fabric in a bleach and water solution for several hours, then rinse it thoroughly. The best way to reverse tie dye is to use bleach.
What Is The Ratio Of Bleach to Water For Reverse Tie Dye?
You will need to mix the bleach and water together in a bowl or container before you begin the reverse tie dye process. The ratio of bleach to water for reverse tie dye is 1:1. This means that for every 1 part bleach, you will need 1 part water.
How Do You Apply Bleach For Reverse Tie Dye?
It is also important to work in a well-ventilated area. When reverse tie dyeing with bleach, you will need to take extra care to avoid getting any on your skin or clothes.
To start, mix a solution of one part bleach to four parts water in a large bowl or bucket. Soak your fabric in the solution for about five minutes, then remove and wring out excess.

Use a sponge or brush to apply the bleach evenly. Next, lay your fabric out on a flat surface and begin applying the bleach solution to the areas you want to lighten.
Wash the fabric in your washing machine on the delicate cycle, then dry as usual. Once you have achieved the desired look, rinse the fabric in cold water to stop the bleaching process.
How Long Do You Let Bleach Tie Dye Sit Before Rinsing?
Assuming you want tips for how long to let bleach sit on tie dye before rinsing:
If you want to avoid this, you can rinse the tie dye in cold water after bleaching it for about 5 minutes. It is important to note that the longer you let bleach sit on the tie dye, the more likely it is that the colors will bleed.
How Do You Rinse and Wash When Your Finished Bleaching?
How do you rinse and wash when your finished bleaching?
First, rinse the fabric in cold water to remove any bleach residue. Next, wash the fabric in a washing machine using the hottest water setting and laundry detergent. Finally, dry the fabric in a dryer on the highest heat setting.
What If I Spill Bleach On My Skin?
If you have a more severe reaction, you should seek medical attention. You should immediately rinse the area with cool water and soap. If you spill bleach on your skin, it can cause irritation, redness, and burning. If you have a mild reaction, you can treat it with a cool compress and over-the-counter antihistamines.
How Do I Wash Tie-Dye For The First Time?
How Do I Wash Tie-Dye For The First Time?

Rinse the tie-dye in cool water until the water runs clear. Wash tie-dye separately from other laundry. To wash your tie-dye for the first time, soak it in cool water with a mild detergent for about 15 minutes. Gently agitate the fabric to loosen any remaining dye.
Is It Better To Bleach Tie Dye Wet or Dry?
Is It Better To Bleach Tie Dye Wet or Dry?
If you are trying to remove tie dye from clothing, it is usually best to do it when the clothing is dry. However, if you are trying to remove tie dye from a surface, it is usually best to do it when the surface is wet. This will help to avoid any further damage to the surface. The answer really depends on the situation. This is a common question when it comes to bleaching tie dye. This will help to avoid any further damage to the fabric.
Frequently Asked Questions
1. How do I reverse tie dye with bleach?
To reverse tie dye with bleach, you will need to soak the fabric in a mixture of bleach and water for several hours. Once the fabric has bleached, rinse it thoroughly and then wash it in the washing machine.
2. What ratio of bleach to water should I use?
For the best results, use a 1:1 ratio of bleach to water.
3. How long should I soak the fabric in the bleach mixture?
Soak the fabric for at least 3 hours, or until the desired level of bleaching is achieved.
4. Can I reverse tie dye with any type of bleach?
Yes, you can use any type of bleach, including chlorine bleach, non-chlorine bleach, or oxygen bleach.
5. What type of fabric can I reverse tie dye?
You can reverse tie dye any type of natural fabric, such as cotton, linen, or wool.
Final thoughts
If you’re not happy with your tie dye project, don’t worry! You can easily reverse the process with bleach. Simply soak the fabric in a bleach and water solution for about 15 minutes. This will remove the color and leave you with a blank slate to start over again.